
When we use images in our application then we face different type of scenarios while handling the image. Before we go into the scenarios / situations of image handling in Application, let us understand the concept of UIImage and UIImageView.
Concept of UIImage and UIImageView (container)
UIImage – Bitmap with different formats Ex png and jpeg. Recommended format is png.UIImageView – This is an iOS Widget that acts like a container for holding the image. To hold the image, UIImageView is required.
When UIImage is shown in UIImageView, there is a property (Content Mode) of UIImageView, that render the Image in UIImageView. We mostly use three types of Content Mode property. These are:
- Scale To Fill
- Aspect Fit
- Aspect Fill
How these Content Mode render the image we can see by following examples
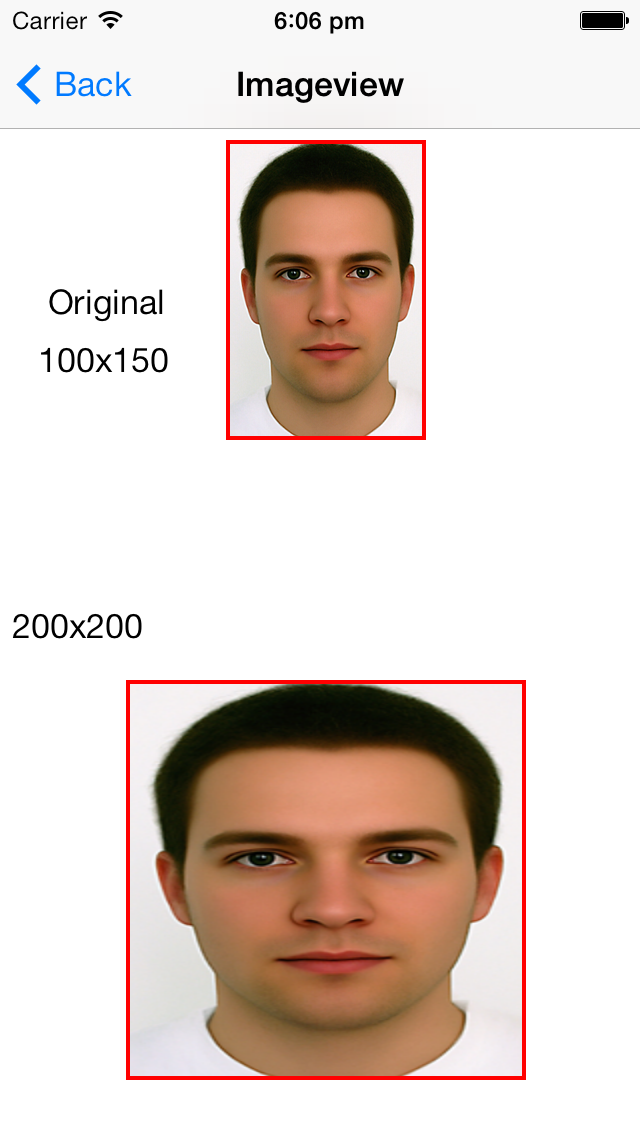
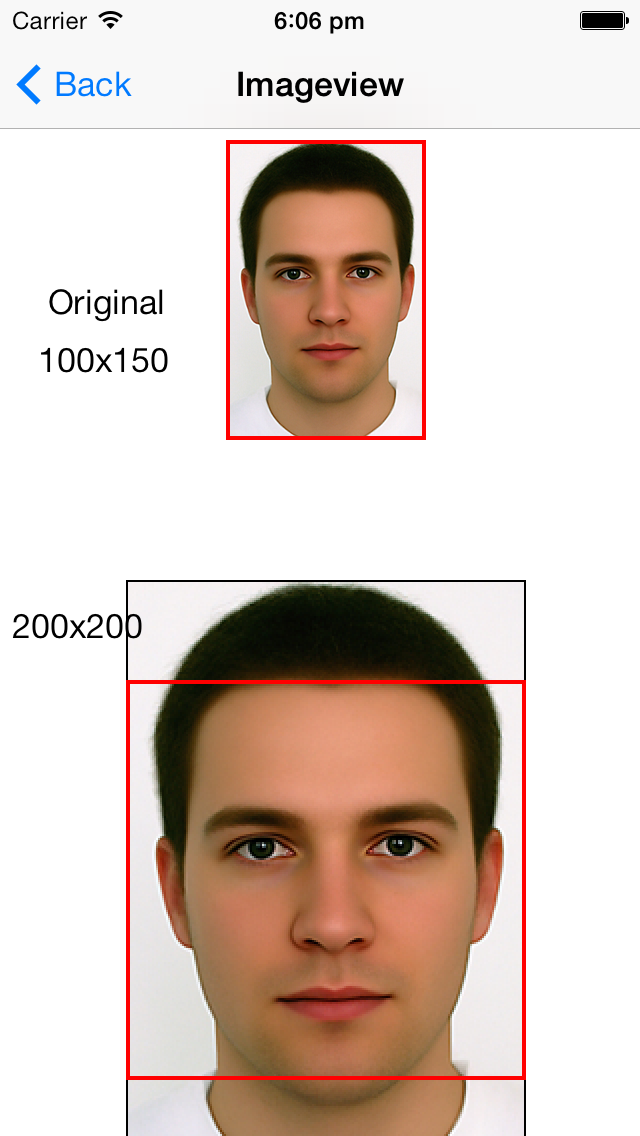
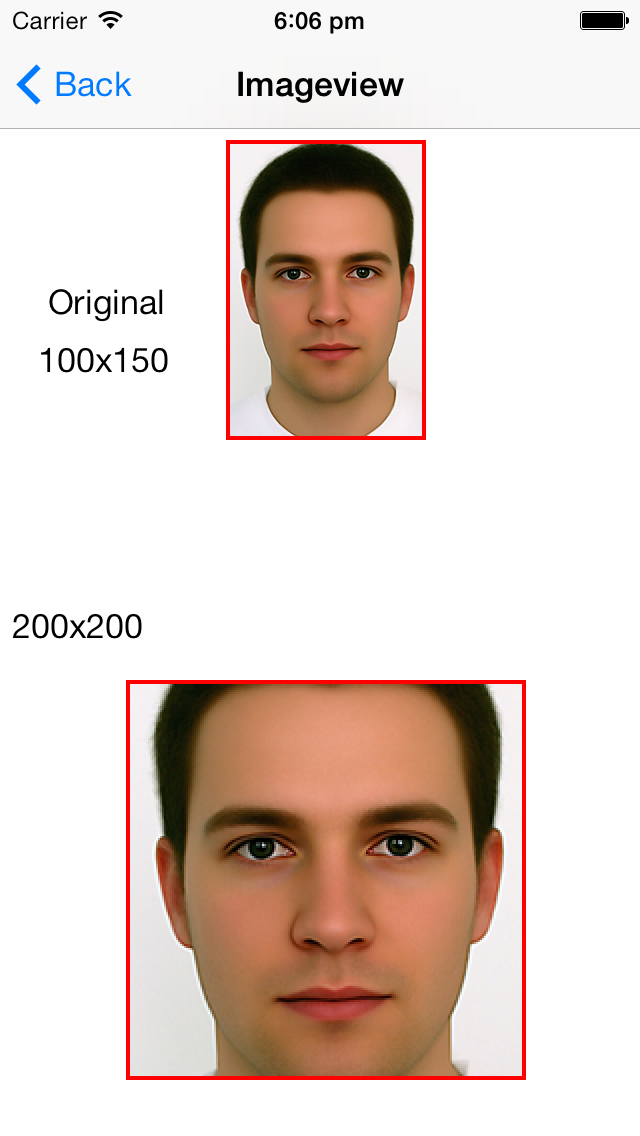
- UIImage of size (100×150)
- UIImageView of size (200×200)
Different Content modes for placing Image in ImageView
1. Scale To Fill
In this case, content is scaled to fill in ImageView with distorted or same aspect ratio. If the image aspect ratio is different than that of container then final image ratio when fitted in the container will be different and hence the image is finally distorted.
(Aspect Ratio is Width / Height)
2. Aspect Fit
In this case, content is scaled to fit in ImageView (container) without changing the aspect ratio of image . Remainder is transparent.

3. Aspect Fill Without Clipping
In this case, image is scaled to fill in ImageView. Aspect ratio of image is not changed.
4. Aspect Fill With Clipping
In this case, content is scaled to fill in ImageView the same way it happen in the above case but then finally image is cropped to the exact size of the ImageView size.
Calculating new width and height with maintaining aspect ratio
Image original width = 100 and height = 150
Container width = 200 and height = 200
x-ratio = Container width / Image original width = 200/100 = 2.0
y-ratio = Container height / Image original height = 200/ 150 = 1.33
Selected ratio = min (x-ratio, y-ratio) = 1.33
Final Image width = Image original width * Selected Ratio = 100 * 1.33 = 133
Final Image height = Image original height * Selected Ratio = 150 * 1.33 = 200
Final Image width x height = 133 x 200 (Original width x height of image was 100 x 150)
Showing Images coming from Server (Different Scenarios)
We can use Aspect Fit mode for all the scenarios. It will serve in every scenario if you don’t want to distort image.
Scenario 1
Image width is lesser than Container width.
Image height is lesser than Container height
Image width = 100 and height = 150
UIImageView width = 200 and height = 200
Final Image width = 133 and height = 200 (Refer the calculations above)
Image is scaled up to fit the container.

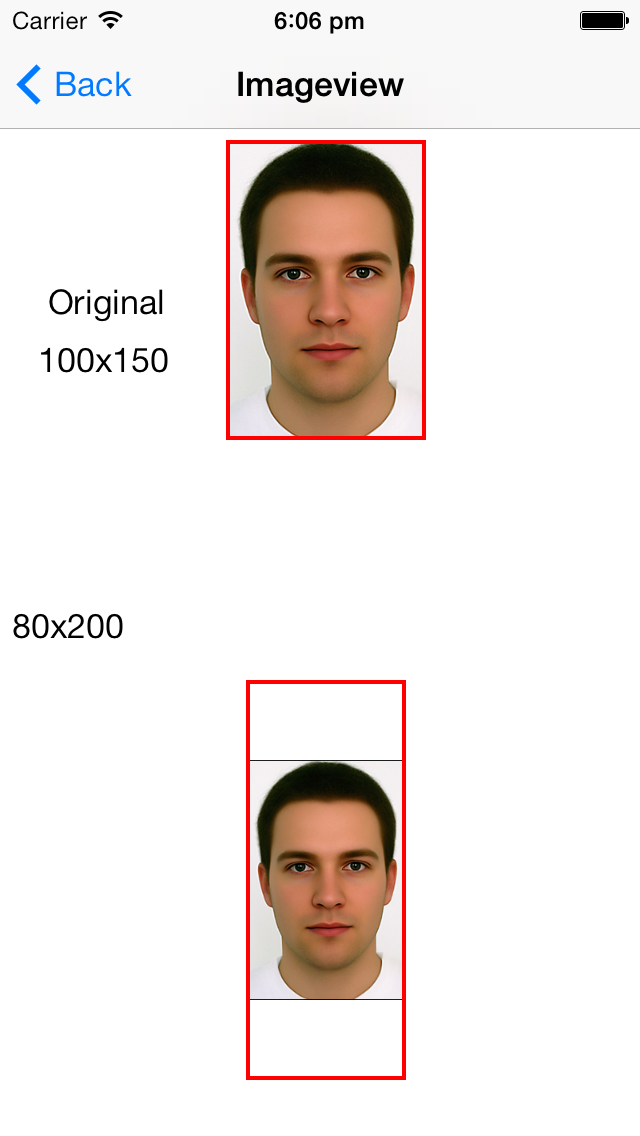
Scenario 2
Image width is greater than Container width.
Image height is lesser than Container height
Image width = 100 and height = 150
UIImageView width = 80 and height = 200
Final Image width = 80 and height = 122
Image is scaled down to fit the container.
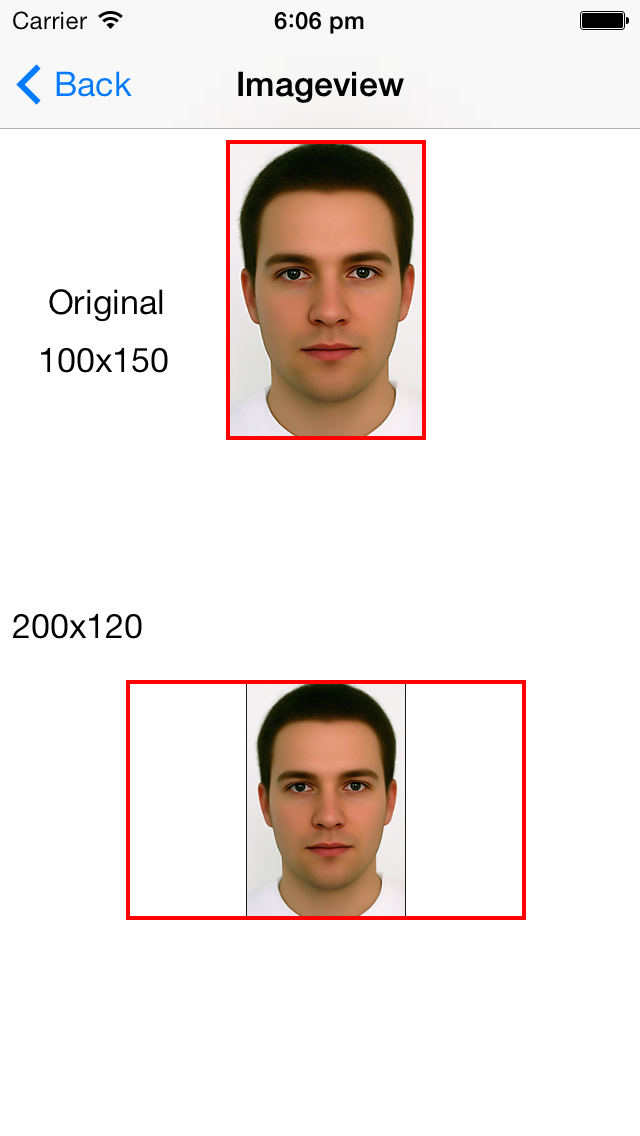
Scenario 3
Image width is lesser than Container width.
Image height is greater than Container height.
Image width = 100 and height = 150
UIImageView width = 200 and height = 120
Final width = 80 and height = 120
Image is scaled down to fit the container.
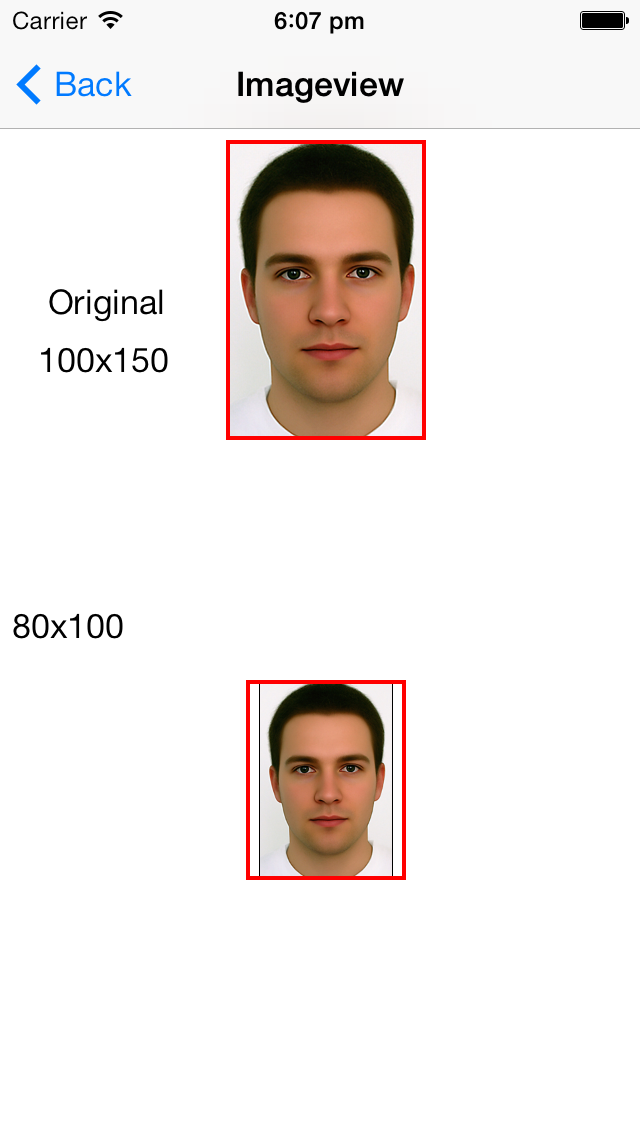
Scenario 4
Image width is greater than Container width.
Image height is greater than Container height.
Image width = 100 and height = 150
UIImageView width = 80 and height = 100
Final width = 66 and height = 100
Image is scaled down to fit the container.
Scenario 5 (Same Aspect Ratio of Image and ImageView)
Image width is greater than Container width.
Image height is greater than Container height.
Image width = 100 and height = 150
UIImageView width = 80 and height = 120
Final width = 80 and height = 120
Image is scaled down to fit the container.

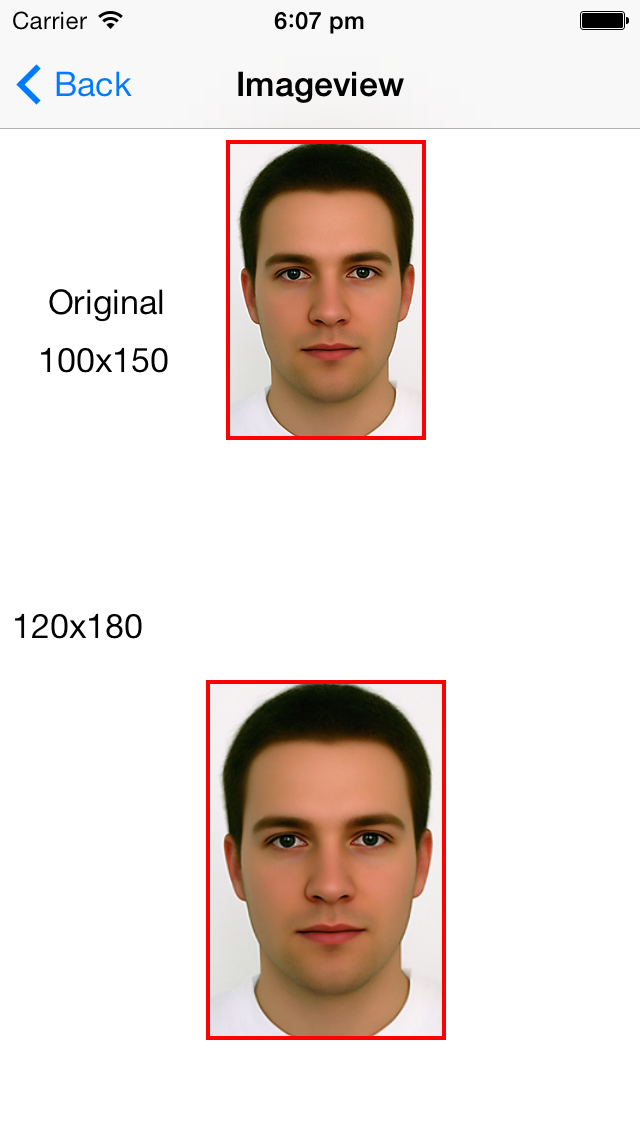
Scenario 6 (Same Aspect Ratio of Image and ImageView)
Image width is lesser than Container width.
Image height is lesser than Container height.
Image width = 100 and height = 150
UIImageView width = 120 and height = 180
Final width = 120 and height = 180
Image is scaled up to fit the container.
How we change the image size and compress image file size-
Uploading Images to the Server (Different Scenarios)
Many times we have to upload images in an application from device (iPhone, iPad) to the server. It could be a photo clicked from the camera or there was an old image that we choose and upload from the application.
Before uploading we can do two things with the image:
1. Change the width and height of original image.
2. Compress the image to be of smaller file size.
Let us understand them.
1. Change the width and height of original image.
To resize the image, we have to configure the drawing environment for rendering into a bitmap.
1# UIGraphicsBeginImageContextWithOptions() method is used to create the bitmap-based graphics context.
This method takes two parameters:
- Size of image (changed size) and
- Scale factor of device as parameter.
Scale factor for Normal Display = 1.0
Scale factor for Retina Display = 2.0
2# – (void) drawInRect:(CGRect)rect; method is used to draw the image in target rectangle.
3# UIGraphicsGetImageFromCurrentImageContext() method is used to get the resized image from drawing environment.
4# UIGraphicsEndImageContext() method is used to clean up the bitmap drawing environment and remove the graphics context from the top of the context stack.
Example :
Original source Image Size = (2448, 3264)
Original source image file size = 3.8 MB
After resizing image to size (1024,768):
Resized source Image Size = (1024,768)
Resized source image file size = 2.0 MB
Code Example:
2. Compress the image to be of smaller file size.
We can compress the image file size by following method.
UIImageJPEGRepresentation() This method takes two parameter
- UIImage object.
- Compress ratio (It can be between 0.0 and 1.0)
This method will return NSData representation of image after compressing.
Example :
Original source Image Size = (2448, 3264)
Original source image file size = 3.8 MB
After compressing image file size by 0.5:
Resized source Image Size = (2448, 3264)
Resized source image file size = 534 KB
Code Example:
Depending upon your requirement whether to reduce the size (width and height in pixels) OR reduce the file size OR Both, you may apply the above.
Original Source: Click Here


You must be logged in to post a comment.